Showing posts with label AMP. Show all posts

April 27, 2020

Tutorial on Increasing Blog Speed Using Lazy Load for AdSense

Increase Blog Speed Using Lazy Load for AdSense


How to Setup Lazy Load for AdSense to Increase Blogger Speed in Google PageSpeed Insight

Table of Contents
Webpage Speed is a Google Ranking Factor
Increase Speed Using Lazy Load for AdSense

How to Setup Lazy Load for AdSense to Increase Blogger Speed in Google PageSpeed Insight

Webpage Speed is a Google Ranking Factor

AMP Blogger - The speed of a website page is one of the factors that determine to rank on Google. This is valid and has been mentioned in many forums held by Google.

Google is more concerned with the convenience of internet users than features in a website and makes the most relevant content that will become the first page on SERP.


To optimize website pages, Google has built a tool that can be used free of charge by Webmasters to maximize the rendering speed of websites. This tool is called Google PageSpeed Insight. 

If you audit a website on Google PSI, you will get results that Google AdSense turned out to be blocking-rendering. That is, the Google AdSense ad script makes your website slow when rendered.

It is certainly detrimental to you and your visitors. But of course, there is a solution to the problem.

This time I will share a solution to speed up loading a website by using Google AdSense Lazy Load. This can maximize the rendering speed of a page that has a large number of ads.

Increase Speed Using Lazy Load for AdSense

I dedicate this tutorial to websites that use Blogger if you use another CMS, you just need to improvise it. 


The first step, you should remove all this AdSense syndicate script.

<script async src="//pagead2.googlesyndication.com/pagead/js/adsbygoogle.js"></script>

<script async='' src="//pagead2.googlesyndication.com/pagead/js/adsbygoogle.js"></script> 

<script async='async' src="//pagead2.googlesyndication.com/pagead/js/adsbygoogle.js"></script>

Note: search one by one the above code, then delete.

Then copy and paste this script, right before </body> or &lt;/body&gt;--&gt; </body>

<script type='text/javascript'>
//<![CDATA[
var lazyadsense=!1;window.addEventListener("scroll",function(){(0!=document.documentElement.scrollTop&&!1===lazyadsense||0!=document.body.scrollTop&&!1===lazyadsense)&&(!function(){var e=document.createElement("script");e.type="text/javascript",e.async=!0,e.src="https://pagead2.googlesyndication.com/pagead/js/adsbygoogle.js";var a=document.getElementsByTagName("script")[0];a.parentNode.insertBefore(e,a)}(),lazyadsense=!0)},!0);
// Lazy Load AdSense
//]]>
</script>

The script will render AdSense Ad if all the content has been rendered. So that it will speed up the speed of your blog, and maximize the score on Google PSI.

Read more: How to Add Google Tag Manager to AMP Blogger Page

URL Image Parameter for Custom Blogger Images

URL Image Parameter for Custom Blogger Images
URL Image Parameter for Custom Blogger Images. How to compress image blogger, convert to webp, and many more


URL Image Parameter for Custom Blogger Images

Blogger.com is a blogging platform provided free by Google. And the space provided is unlimited, including for image storage.
But there are some bloggers who have not even utilized the unlimited and free image hosting facilities from this blogger. There are still bloggers who still save their pictures in third parties.
Of course this is actually not a big problem, but there are some Blogger codes that do not support hosting other party images such as code for thumbnail post.
For that, it is recommended to post pictures please upload directly to the post. No need to worry about storage space because Blogger image hoster gas unlimited space.
Likewise for images for other purposes such as favicons, manifest.json, blog logos, and others, please upload them on Blogger.
If you do not understand how to take the URL of an image hosted on Blogger, I have made a video, please watch it to better understand.
And in the image URL that is stored on Blogger, there are several parameters that can make it easier for us to modify the image.
Usually the image URL that is hosted on Blogger or uploaded on the post will look like this.
https://1.bp.blogspot.com/xxxxxxxx/xxxxxxxx/xxxxxxxx/s..../imagepng
Blogger provides 4 domains for hosting images, namely https://1.bp.blogspot.com, https://2.bp.blogspot.com, https://3.bp.blogspot.com, and https: / /4.bp.blogspot.com.
Note the s.... code which is marked, in that code we can modify the image with the following parameters.

List of parameters for modifying Blogger images

1. s (square or maybe size), meaning square. By default, Blogger uses param s for images uploaded in posts. Param s is usually followed by a value that indicates the size of the image in pixels, taken from the largest side. If the square is horizontal, then the width value is taken. If the vertical square, the high value is taken.
Example: s320
If you want the size according to the original you can use the value according to the original width or height which has the largest value, for example s3250 or can use s0.
2. w (width), meaning width. To determine the desired width, for example w320.
3. h (height), meaning height. To determine the desired height, for example h320.
If w and h are combined, then what is taken is the value of h, for example w500-h100 then the benchmark is the value of h and the width of w will follow the comparison.
4. c (crop), meaning to cut. To crop the image at the top according to the value specified by the other param in front of it. For example: s320-c will cut a square with a width and height of 320px at the top of the image, w320-h100-c will cut with a width of 320px and a height of 100px at the top of the image.
5. n is the same as c but cuts it right in the middle.
6. p is the same as n and c but cut from the midpoint of the image.
7. cc (circle crop), meaning to cut round and the outer side will be a white area. s320-cc is a circle with a diameter of 320px, w500-h750-cc is a circle with a diameter of 500px (the smallest value is taken).
8. It's useful to prevent changes in image size that is larger than the original dimensions. For example, if the width of the original image is 600 pixels, then even if it determines a wider width such as w1600-nu, the image will not be larger than the original width.
9. fv (vertical flip) reverses the image vertically, for example s320-fv
10. fh (flip horizontal) flips the image horizontally, for example s320-fh
11. r (rotate) rotates the image to a value of 90, 180, or 270, for example s320-r90 then the image will tilt to the right 90 degrees.
12. rj to change the image format from PNG or GIF to JPG.
13. rp to change the image format from JPG or GIF to PNG.
14. rw to change the image format from JPG or PNG to WEBP.
15. rh to change the GIF format to MP4 so that it can be a source in the HTML5 <video> tag.
Example:
<video controls>
<source src="https://1.bp.blogspot.com/xxxxxxxx/xxxxxxxx/xxxxxxxx/s500-rh/video.gif" type="video/mp4">
</video>
16. l to compress image quality, for example, s320-rj-l85, the image will be a JPG format with 85% quality with a size of 320px.
17. d (download) functions to download images when the image URL is used as a link, for example: s320-d.
Those are some parameters that might be useful for modifying images uploaded in posts.
Maybe useful.

Post New Blogger Article to Facebook Automatically

Post New Blogger Article to Facebook Automatically


Table of Contents

  • How to Reg Account
  • How to Connect Blogger to DLVRIT
  • How to Connect Blog with Social using DLVRIT


How to Post New Blogger Article to Facebook Automatically with Third Party App

Facebook is one of the most widely used social media on the Internet today. So, Facebook is one of the good media promotions.

Bloggers and Webmasters must certainly use Facebook to bring in large visitors to website. Usually companies or websites have a Facebook account to promote their content.

Usually. for large media that publish many articles every day, many of them use third-party application to make it easier to promote their latest articles on Facebook.

These third party applications are able to automatically upload the latest articles to Facebook FansPage.


This time, I will share the tutorial about How to Post New Published Article to Facebook Automatically with Third Party App. That app called DLVR.IT 

How to Reg Account 

Go to https://dlvrit.com/ and click Sign Up free, create new account with your email and your password.  Or you can sign up with your Facebook aor Twitter Account.

After register successful, you will redirect to DLVRIT dashboard. Now, you will connect your Blog to Facebook.

How to Connect Blogger to DLVRIT

To post new content automatic to Facebook, you need connect your blog to DLVRIT. 


Post New Blogger Article to Facebook Automatically


Navigate Automate, and fill your Blog Feed in form. If you using Blogger.com, the Feed slug is /atom.xml
For Example: https://www.amp-blogger.com/atom.xml

Read more: How to Add Google Tag Manager to AMP Blogger Page
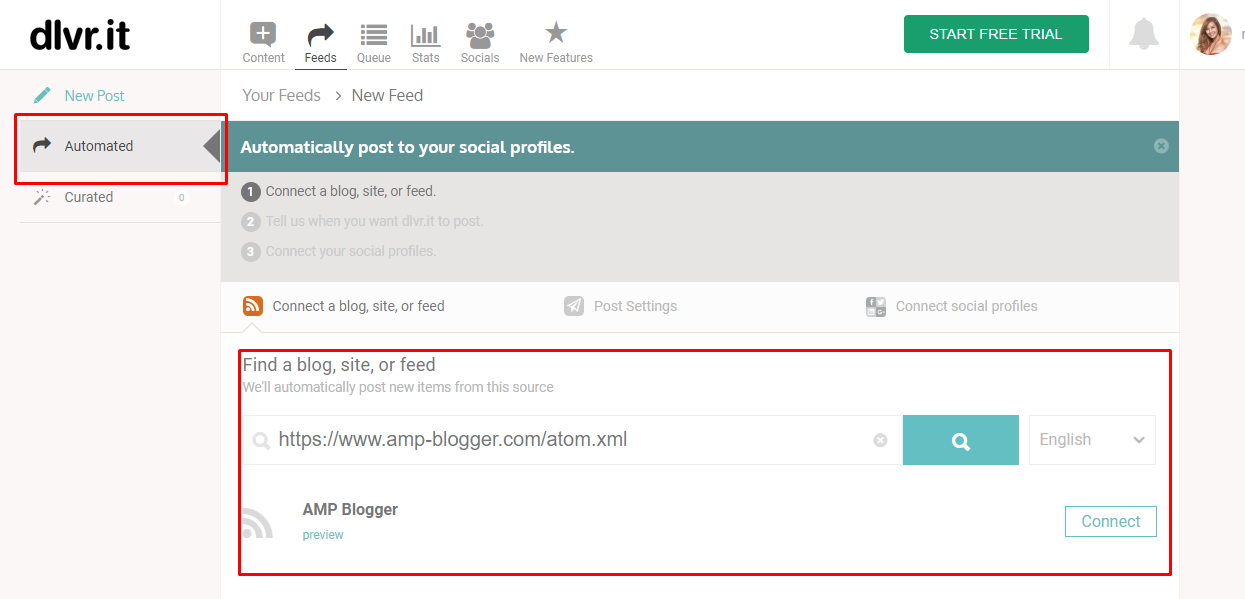

It will show your valid Blogger feed. Click Connect. Now your blog was connected to DLVRIT.

How to Connect Blog with Social using DLVRIT

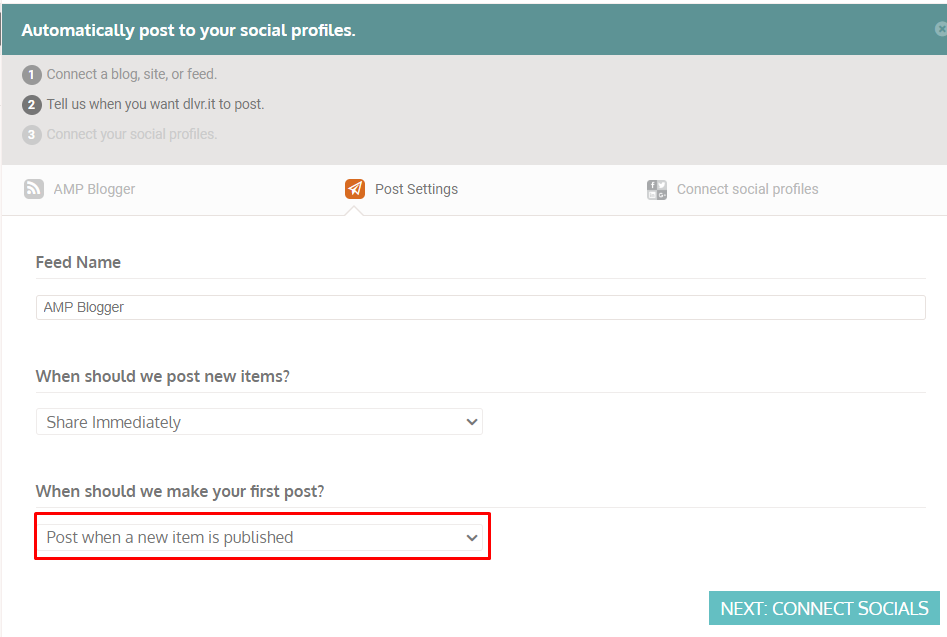
Next step, you need to connect your Blog to Facebook using DLVRIT.  In tab When should we make your first post? choose Post When New item Published then click Connect Social.

Post New Blogger Article to Facebook Automatically
Now login to your Facebook Account. After login, back to DLVRIT Dashboard and click Connect New. 

Choose Facebook Icon, then connect your Facebook to DLVRIT. Choose your Fanspage and click Allow.

Finish, your Facebook will publish your new Blog content after it published. 

Thanks for reading. Please rate and give comment below. If you like my content and learn't something from me you can donate by PayPal.

Tutorial on How to Bring up Thumbnails on AMP HTML Blogger Template

How To Bring Up Thumbnails On AMP HTML Blogger Template

rial on How to Bring up Thumbnails on AMP HTML Blogger Template
I used the AMP blogger template and changed all the articles including the <img> code to <amp-img>, but how come the thumbnails don't appear? I wonder why?

It turns out that the blogger template will not read thumbnails if all the images in an article are converted into <amp-img> code.

thumbnail does not appear


As we know, that the IMG tag in AMP HTML changes to amp-img. If we write in posts like this:
<img alt = 'image' src = 'url-image' />
it will result in an AMP HTML validation error. The correct writing like here is:
<amp-img src = "url-image-here.png"
    width = "1080"
    height = "610"
    layout = "responsive"
    alt = "AMP HTML"> </amp-img>
Image will appear well on the post. However, it will not appear on the thumbnail on the main page / homepage. To outsmart it, so that the image appears on the Homepage add a noscript tag so the code becomes like this:

<Noscript> <Img Alt = 'Image' Src = 'Url-Image-You' /> </Noscript>

Good luck ...

Thus the Tutorial Article How to Bring up Thumbnails on AMP HTML Blogger Template. Hopefully the solution of your "confusion": D