Showing posts with label CSS. Show all posts

April 27, 2020

Tutorial on Increasing Blog Speed Using Lazy Load for AdSense

Increase Blog Speed Using Lazy Load for AdSense


How to Setup Lazy Load for AdSense to Increase Blogger Speed in Google PageSpeed Insight

Table of Contents
Webpage Speed is a Google Ranking Factor
Increase Speed Using Lazy Load for AdSense

How to Setup Lazy Load for AdSense to Increase Blogger Speed in Google PageSpeed Insight

Webpage Speed is a Google Ranking Factor

AMP Blogger - The speed of a website page is one of the factors that determine to rank on Google. This is valid and has been mentioned in many forums held by Google.

Google is more concerned with the convenience of internet users than features in a website and makes the most relevant content that will become the first page on SERP.


To optimize website pages, Google has built a tool that can be used free of charge by Webmasters to maximize the rendering speed of websites. This tool is called Google PageSpeed Insight. 

If you audit a website on Google PSI, you will get results that Google AdSense turned out to be blocking-rendering. That is, the Google AdSense ad script makes your website slow when rendered.

It is certainly detrimental to you and your visitors. But of course, there is a solution to the problem.

This time I will share a solution to speed up loading a website by using Google AdSense Lazy Load. This can maximize the rendering speed of a page that has a large number of ads.

Increase Speed Using Lazy Load for AdSense

I dedicate this tutorial to websites that use Blogger if you use another CMS, you just need to improvise it. 


The first step, you should remove all this AdSense syndicate script.

<script async src="//pagead2.googlesyndication.com/pagead/js/adsbygoogle.js"></script>

<script async='' src="//pagead2.googlesyndication.com/pagead/js/adsbygoogle.js"></script> 

<script async='async' src="//pagead2.googlesyndication.com/pagead/js/adsbygoogle.js"></script>

Note: search one by one the above code, then delete.

Then copy and paste this script, right before </body> or &lt;/body&gt;--&gt; </body>

<script type='text/javascript'>
//<![CDATA[
var lazyadsense=!1;window.addEventListener("scroll",function(){(0!=document.documentElement.scrollTop&&!1===lazyadsense||0!=document.body.scrollTop&&!1===lazyadsense)&&(!function(){var e=document.createElement("script");e.type="text/javascript",e.async=!0,e.src="https://pagead2.googlesyndication.com/pagead/js/adsbygoogle.js";var a=document.getElementsByTagName("script")[0];a.parentNode.insertBefore(e,a)}(),lazyadsense=!0)},!0);
// Lazy Load AdSense
//]]>
</script>

The script will render AdSense Ad if all the content has been rendered. So that it will speed up the speed of your blog, and maximize the score on Google PSI.

Read more: How to Add Google Tag Manager to AMP Blogger Page

URL Image Parameter for Custom Blogger Images

URL Image Parameter for Custom Blogger Images
URL Image Parameter for Custom Blogger Images. How to compress image blogger, convert to webp, and many more


URL Image Parameter for Custom Blogger Images

Blogger.com is a blogging platform provided free by Google. And the space provided is unlimited, including for image storage.
But there are some bloggers who have not even utilized the unlimited and free image hosting facilities from this blogger. There are still bloggers who still save their pictures in third parties.
Of course this is actually not a big problem, but there are some Blogger codes that do not support hosting other party images such as code for thumbnail post.
For that, it is recommended to post pictures please upload directly to the post. No need to worry about storage space because Blogger image hoster gas unlimited space.
Likewise for images for other purposes such as favicons, manifest.json, blog logos, and others, please upload them on Blogger.
If you do not understand how to take the URL of an image hosted on Blogger, I have made a video, please watch it to better understand.
And in the image URL that is stored on Blogger, there are several parameters that can make it easier for us to modify the image.
Usually the image URL that is hosted on Blogger or uploaded on the post will look like this.
https://1.bp.blogspot.com/xxxxxxxx/xxxxxxxx/xxxxxxxx/s..../imagepng
Blogger provides 4 domains for hosting images, namely https://1.bp.blogspot.com, https://2.bp.blogspot.com, https://3.bp.blogspot.com, and https: / /4.bp.blogspot.com.
Note the s.... code which is marked, in that code we can modify the image with the following parameters.

List of parameters for modifying Blogger images

1. s (square or maybe size), meaning square. By default, Blogger uses param s for images uploaded in posts. Param s is usually followed by a value that indicates the size of the image in pixels, taken from the largest side. If the square is horizontal, then the width value is taken. If the vertical square, the high value is taken.
Example: s320
If you want the size according to the original you can use the value according to the original width or height which has the largest value, for example s3250 or can use s0.
2. w (width), meaning width. To determine the desired width, for example w320.
3. h (height), meaning height. To determine the desired height, for example h320.
If w and h are combined, then what is taken is the value of h, for example w500-h100 then the benchmark is the value of h and the width of w will follow the comparison.
4. c (crop), meaning to cut. To crop the image at the top according to the value specified by the other param in front of it. For example: s320-c will cut a square with a width and height of 320px at the top of the image, w320-h100-c will cut with a width of 320px and a height of 100px at the top of the image.
5. n is the same as c but cuts it right in the middle.
6. p is the same as n and c but cut from the midpoint of the image.
7. cc (circle crop), meaning to cut round and the outer side will be a white area. s320-cc is a circle with a diameter of 320px, w500-h750-cc is a circle with a diameter of 500px (the smallest value is taken).
8. It's useful to prevent changes in image size that is larger than the original dimensions. For example, if the width of the original image is 600 pixels, then even if it determines a wider width such as w1600-nu, the image will not be larger than the original width.
9. fv (vertical flip) reverses the image vertically, for example s320-fv
10. fh (flip horizontal) flips the image horizontally, for example s320-fh
11. r (rotate) rotates the image to a value of 90, 180, or 270, for example s320-r90 then the image will tilt to the right 90 degrees.
12. rj to change the image format from PNG or GIF to JPG.
13. rp to change the image format from JPG or GIF to PNG.
14. rw to change the image format from JPG or PNG to WEBP.
15. rh to change the GIF format to MP4 so that it can be a source in the HTML5 <video> tag.
Example:
<video controls>
<source src="https://1.bp.blogspot.com/xxxxxxxx/xxxxxxxx/xxxxxxxx/s500-rh/video.gif" type="video/mp4">
</video>
16. l to compress image quality, for example, s320-rj-l85, the image will be a JPG format with 85% quality with a size of 320px.
17. d (download) functions to download images when the image URL is used as a link, for example: s320-d.
Those are some parameters that might be useful for modifying images uploaded in posts.
Maybe useful.

How to Make Recent Post Widget for AMP Blogger Template

How to Make Recent Post Widget for AMP Blogger Template


Tutorial how to make Widget Recent Post for Blogger Template valid AMP HTML. Read this article. Recent Post widget developed by Kompi Ajaib, valid Google AMP HTML for Blogger/Blogspot

Table of Contents:
Recent Post for AMP Blogger
Demo

Tutorial how to make Widget Recent Post for AMP Blogger Template

Blogger widgets become one of the important components in a blog. A widget function to beautify the appearance of the template and aim to make navigating a Website easy.


Even widgets like Popular Post Widget and Recent Post can reduce the bounce rate of a Blog. This is usually what will improve the performance of the Website and ad revenue.

This time, I will share the tutorial on making Recent Post Widget that can display the latest articles on a Blogger blog. This widget is valid AMP HTML, so it fits you apply to AMP Blogger Template.

Recent Post for AMP Blogger

This widget was developed by Kompi Ajaib, a famous blog that discusses a lot of Blogging Tutorial contents. This Recent Post widget uses the amp-iframe component, so make sure you have placed the amp-iframe component on <head>.

<script async='' custom-element="amp-iframe" src="https://cdn.ampproject.org/v0/amp-iframe-0.1.js"></script>

Kompi Ajaib has prepared Javascript and HTML that has been hosted on Github, so you can simply embed using amp-iframe. I have prepared it.

Copy this following code in Sidebar, please Edit your template, and paste this following code.
          <b:widget id='HTML97' locked='false' title='' type='HTML' version='1'>
            <b:widget-settings>
              <b:widget-setting name='content'><![CDATA[<!--recentpost-->]]></b:widget-setting>
            </b:widget-settings>
            <b:includable id='main'>
  <!-- only display title if it's non-empty -->
  <b:if cond='data:title != &quot;&quot;'>
    <h2 class='title'><data:title/></h2>
  </b:if>
  <div class='widget-content'>
    <data:content/>
<b:if cond='data:blog.pageType == &quot;item&quot;'>
<amp-iframe expr:src='&quot;https://cdn.staticaly.com/gh/KompiAjaib/kompi-html/master/recentpost-amp.html?fontSize=16px&amp;color=333&amp;url=&quot; + data:blog.homepageUrl' frameborder='0' height='488' layout='fixed-height' noloading='' sandbox='allow-forms allow-scripts allow-same-origin allow-modals allow-popups' title='Recent Posts'>
    <amp-img height='488' layout='fixed-height' noloading='' placeholder='' src='https://blogger.googleusercontent.com/img/b/R29vZ2xl/AVvXsEiaqa7Q5P7TfDt_FvpkQV-X0rBPfCqVKzY5G2QpL9kYXBs8acUvZevkFgAa9yNcqfrtUMOBWGi1O0dOprbWCShQh2R9KR5QE9RnNkijoRNuH5sc44YMf_QY2Fq-FGT1-ht8iOz_UlS2rdo/s1600/back-iframe.png' width='auto'>
    </amp-img>
  </amp-iframe>
  </b:if>
  </div>
</b:includable>
          </b:widget>

If you are confused about how to place the code, you can use the manual method. Click Layout on the Blogger.com dashboard, then Add Gadget, and choose HTML / JavaScript.


<amp-iframe frameborder="0"
    height="500"
    layout="fixed-height"
    sandbox='allow-forms allow-scripts allow-same-origin allow-modals allow-popups' 
    src="https://cdn.staticaly.com/gh/KompiAjaib/kompi-html/master/recentpost-amp.html?url=https://www.amp-blogger.com/">
    </amp-iframe>

Paste the code below, then replace the yellow mark with the address of your blog.

Tutorial on How to Change the Font Type on Blogger / Website using CSS


Tutorial on How to Change the Font Type on Blogger / Website using CSS

how to Change font type on Blogger.com with Google Fonts. This is step by step change font using CSS. It's easy!

Table of Contents

1. How to change fonts on the website
2. How to Change the Font Type on Blogspot


How to Change the Font Type on Blogger / Website using CSS

The choice of font type is an important factor in developing web design. Fonts that are clear and easy to read, will certainly have a big effect on the blog.
More than 50% of websites on the Internet, use the sans-serif font type which is most obvious to read. Google Fonts becomes one of the free font providers that can be applied on a web page or blog.
Of course, using Google Fonts must follow a few steps in order to be implemented in website design. amp-blogger.com will provide a way to change the Font type on a web page using CSS.

How to change fonts on the website

Here are the steps:
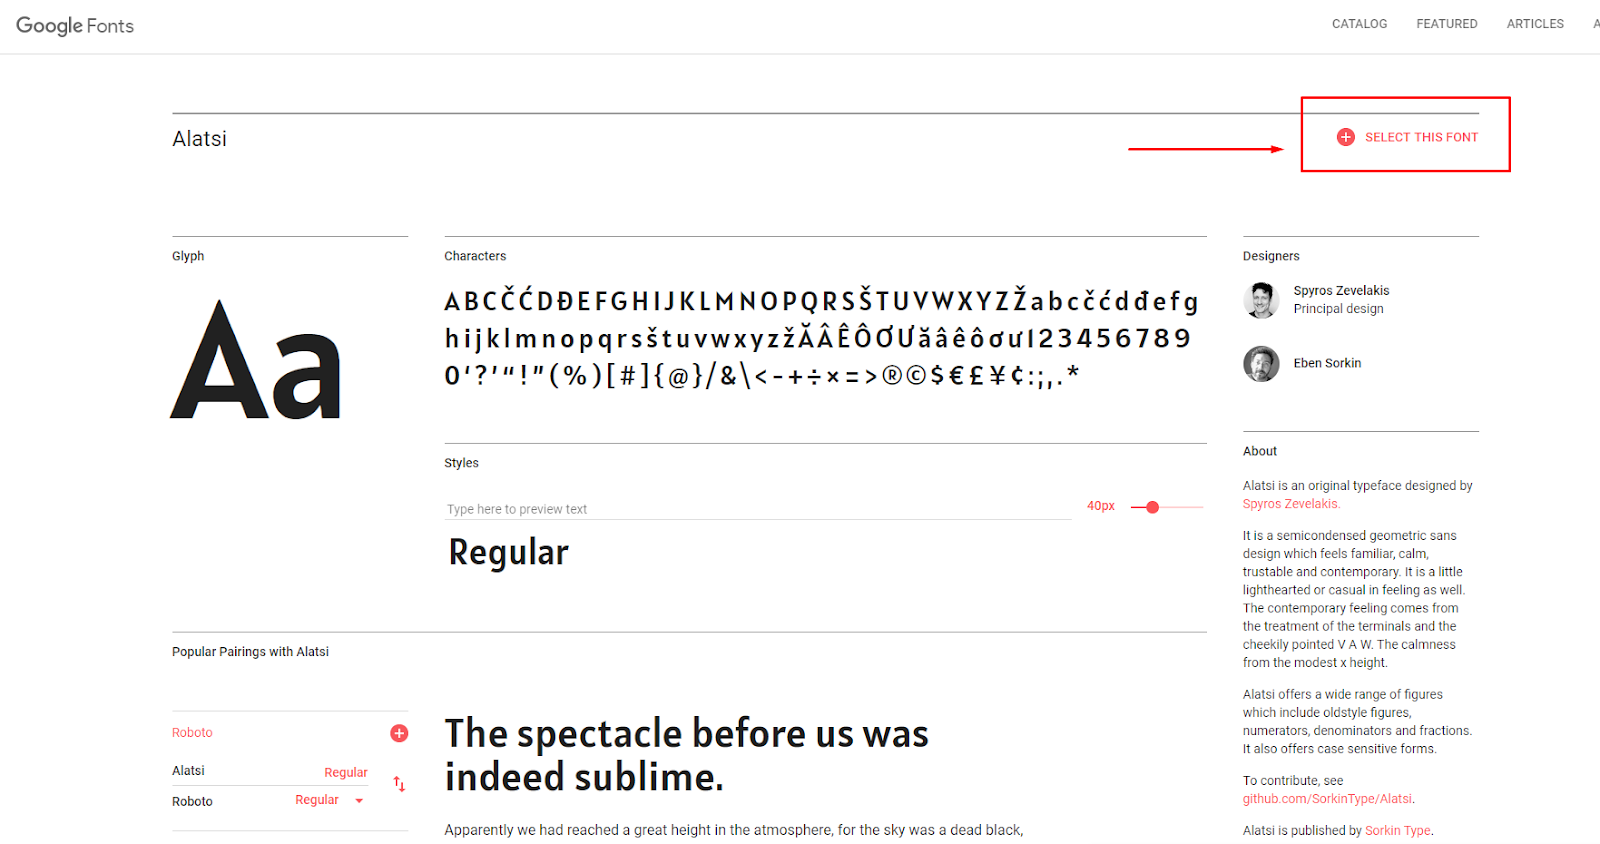
Open https://fonts.google.com/ then choose one type of font that you like. Here I will choose Tools.
hange the Font Type on Blogger
Click "Select this Font" in the left bar of Google Font. Then copy the <link> code provided.

Paste the code before </head>, see the example below:
<head>
....
<link href="https://fonts.googleapis.com/css?family=Alatsi&display=swap" rel="stylesheet" />
....
</head>
Then we will change all font types currently used, with new fonts.
Back on the Google Fonts page, copy the CSS by following the body tag on the page on your website. Examples like this:
body {font-family: 'Alatsi', sans-serif;}
The code will change all font types on your website pages.
If you only want to change the font on a particular page, then it must be adjusted to the existing div. For example:
#menu {font-family: 'Tool', sans-serif;}
or
#footer {font-family: 'Alatsi', sans-serif;}
Then do the Save to update your website, and see the results.

How to Change the Font Type on Blogspot

To change the font type on Blogger.com, the best way is to use HTML Edit mode.
Click Template on the Blogger.com dashboard, then click Edit HTML.
Search </head> then copy the <link> code provided by Google Fonts. Paste between <head>.
<head>
....
<link href="https://fonts.googleapis.com/css?family=Alatsi&display=swap" rel="stylesheet" />
....
</head>
Search ]]></b:skin> and paste the CSS given to Google Fonts before ]]></b:skin>.
If there is a CSS font-family in the body tag, delete it and replace it with the new code.
Click Save to make changes.
that's a simple way to change the font type on your website. May be useful :)

Create an Automatic Watermark on Blogger Image Articles

Create an Automatic Watermark on Blogger Image Articles


How to Create an Automatic Watermark on Image Articles on Blogger. Automatically image watermark for blogspot domain blog


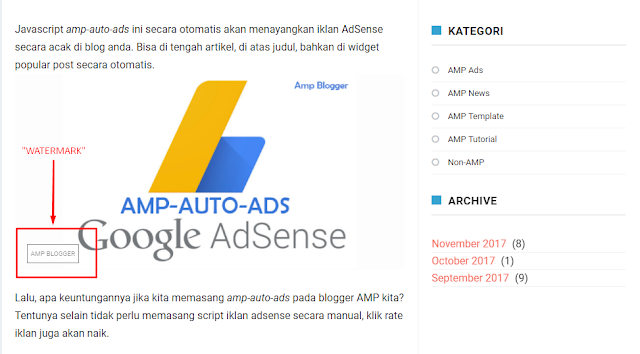
  1. What kind of "watermark" that I mean?
  2. What CSS do I use to create "WATERMARK"?
  3. How to implement it?
  4. Is it done?