Showing posts with label seo. Show all posts

April 27, 2020

Post New Blogger Article to Facebook Automatically

Post New Blogger Article to Facebook Automatically


Table of Contents

  • How to Reg Account
  • How to Connect Blogger to DLVRIT
  • How to Connect Blog with Social using DLVRIT


How to Post New Blogger Article to Facebook Automatically with Third Party App

Facebook is one of the most widely used social media on the Internet today. So, Facebook is one of the good media promotions.

Bloggers and Webmasters must certainly use Facebook to bring in large visitors to website. Usually companies or websites have a Facebook account to promote their content.

Usually. for large media that publish many articles every day, many of them use third-party application to make it easier to promote their latest articles on Facebook.

These third party applications are able to automatically upload the latest articles to Facebook FansPage.


This time, I will share the tutorial about How to Post New Published Article to Facebook Automatically with Third Party App. That app called DLVR.IT 

How to Reg Account 

Go to https://dlvrit.com/ and click Sign Up free, create new account with your email and your password.  Or you can sign up with your Facebook aor Twitter Account.

After register successful, you will redirect to DLVRIT dashboard. Now, you will connect your Blog to Facebook.

How to Connect Blogger to DLVRIT

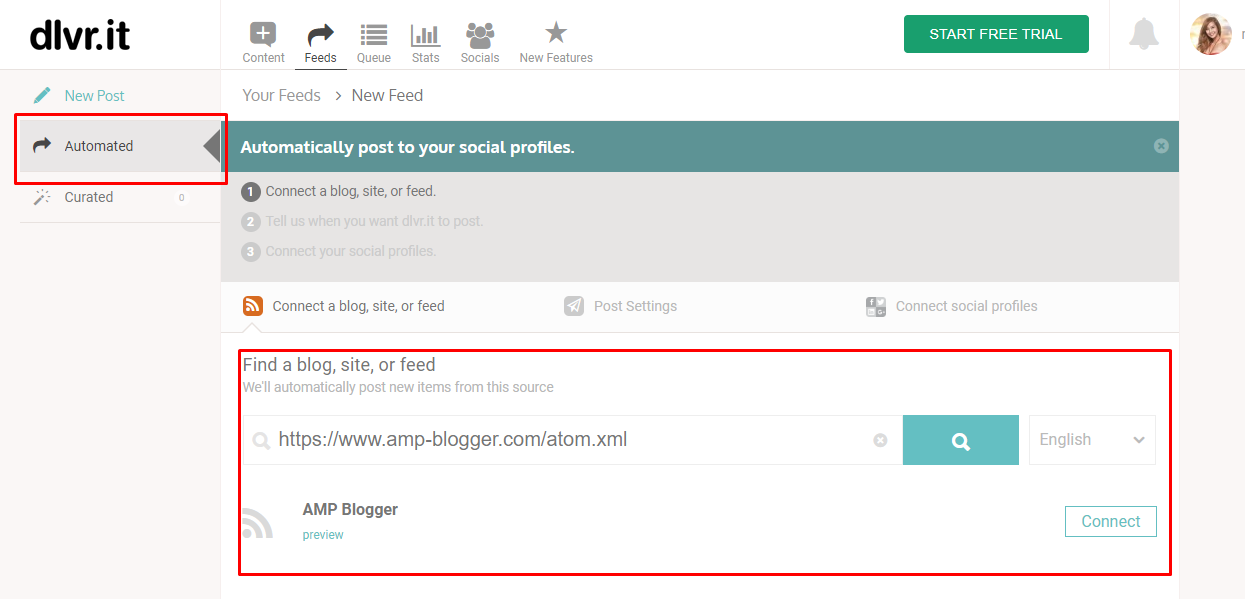
To post new content automatic to Facebook, you need connect your blog to DLVRIT. 

Post New Blogger Article to Facebook Automatically


Navigate Automate, and fill your Blog Feed in form. If you using Blogger.com, the Feed slug is /atom.xml
For Example: https://www.amp-blogger.com/atom.xml

Read more: How to Add Google Tag Manager to AMP Blogger Page


It will show your valid Blogger feed. Click Connect. Now your blog was connected to DLVRIT.

How to Connect Blog with Social using DLVRIT

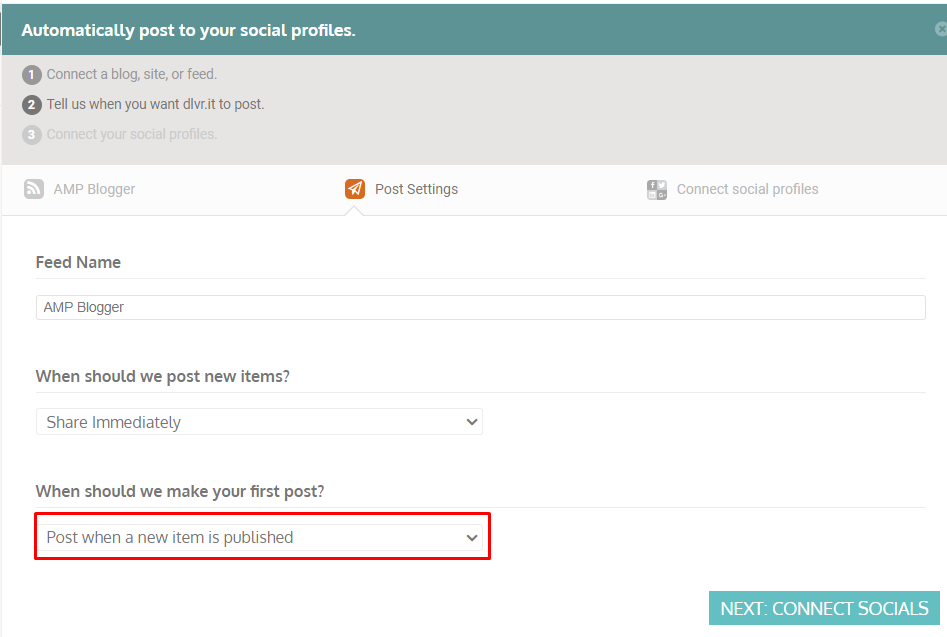
Next step, you need to connect your Blog to Facebook using DLVRIT.  In tab When should we make your first post? choose Post When New item Published then click Connect Social.
Post New Blogger Article to Facebook Automatically
Now login to your Facebook Account. After login, back to DLVRIT Dashboard and click Connect New

Choose Facebook Icon, then connect your Facebook to DLVRIT. Choose your Fanspage and click Allow.

Finish, your Facebook will publish your new Blog content after it published. 

Thanks for reading. Please rate and give comment below. If you like my content and learn't something from me you can donate by PayPal.

How to Make Recent Post Widget for AMP Blogger Template

How to Make Recent Post Widget for AMP Blogger Template


Tutorial how to make Widget Recent Post for Blogger Template valid AMP HTML. Read this article. Recent Post widget developed by Kompi Ajaib, valid Google AMP HTML for Blogger/Blogspot

Table of Contents:
Recent Post for AMP Blogger
Demo

Tutorial how to make Widget Recent Post for AMP Blogger Template

Blogger widgets become one of the important components in a blog. A widget function to beautify the appearance of the template and aim to make navigating a Website easy.


Even widgets like Popular Post Widget and Recent Post can reduce the bounce rate of a Blog. This is usually what will improve the performance of the Website and ad revenue.

This time, I will share the tutorial on making Recent Post Widget that can display the latest articles on a Blogger blog. This widget is valid AMP HTML, so it fits you apply to AMP Blogger Template.

Recent Post for AMP Blogger

This widget was developed by Kompi Ajaib, a famous blog that discusses a lot of Blogging Tutorial contents. This Recent Post widget uses the amp-iframe component, so make sure you have placed the amp-iframe component on <head>.

<script async='' custom-element="amp-iframe" src="https://cdn.ampproject.org/v0/amp-iframe-0.1.js"></script>

Kompi Ajaib has prepared Javascript and HTML that has been hosted on Github, so you can simply embed using amp-iframe. I have prepared it.

Copy this following code in Sidebar, please Edit your template, and paste this following code.
          <b:widget id='HTML97' locked='false' title='' type='HTML' version='1'>
            <b:widget-settings>
              <b:widget-setting name='content'><![CDATA[<!--recentpost-->]]></b:widget-setting>
            </b:widget-settings>
            <b:includable id='main'>
  <!-- only display title if it's non-empty -->
  <b:if cond='data:title != &quot;&quot;'>
    <h2 class='title'><data:title/></h2>
  </b:if>
  <div class='widget-content'>
    <data:content/>
<b:if cond='data:blog.pageType == &quot;item&quot;'>
<amp-iframe expr:src='&quot;https://cdn.staticaly.com/gh/KompiAjaib/kompi-html/master/recentpost-amp.html?fontSize=16px&amp;color=333&amp;url=&quot; + data:blog.homepageUrl' frameborder='0' height='488' layout='fixed-height' noloading='' sandbox='allow-forms allow-scripts allow-same-origin allow-modals allow-popups' title='Recent Posts'>
    <amp-img height='488' layout='fixed-height' noloading='' placeholder='' src='https://blogger.googleusercontent.com/img/b/R29vZ2xl/AVvXsEiaqa7Q5P7TfDt_FvpkQV-X0rBPfCqVKzY5G2QpL9kYXBs8acUvZevkFgAa9yNcqfrtUMOBWGi1O0dOprbWCShQh2R9KR5QE9RnNkijoRNuH5sc44YMf_QY2Fq-FGT1-ht8iOz_UlS2rdo/s1600/back-iframe.png' width='auto'>
    </amp-img>
  </amp-iframe>
  </b:if>
  </div>
</b:includable>
          </b:widget>

If you are confused about how to place the code, you can use the manual method. Click Layout on the Blogger.com dashboard, then Add Gadget, and choose HTML / JavaScript.


<amp-iframe frameborder="0"
    height="500"
    layout="fixed-height"
    sandbox='allow-forms allow-scripts allow-same-origin allow-modals allow-popups' 
    src="https://cdn.staticaly.com/gh/KompiAjaib/kompi-html/master/recentpost-amp.html?url=https://www.amp-blogger.com/">
    </amp-iframe>

Paste the code below, then replace the yellow mark with the address of your blog.

Create an Automatic Watermark on Blogger Image Articles

Create an Automatic Watermark on Blogger Image Articles


How to Create an Automatic Watermark on Image Articles on Blogger. Automatically image watermark for blogspot domain blog


  1. What kind of "watermark" that I mean?
  2. What CSS do I use to create "WATERMARK"?
  3. How to implement it?
  4. Is it done?

Change AMP Blogger Parameter URL from m=1 to amp=1

Change AMP Blogger Parameter URL from m=1 to amp=1


Step by Step: How to Change AMP Blogger Parameter URL from m=1 to amp=1. and All benefits you gets from amp=1


Change Blogger AMP Parameter URL from m=1 to amp=1

The template that I use on this blog is called Alinux AMP, where there are some visitors who are "aware" that the URL for my AMP page is valid using the parameter 'amp = 1, isn't it? M = 1 . 

Then there are some blogger friends who send messages via Facebook, asking how to change the URL parameters for the Blogger AMP page to be ?amp=1I try to explain in this article. 

I have tried changing it using conditional data 'data:blog.url + &quot;?amp=1&quot'but it seems to be ineffective and encounters some errors. Until finally I found out a more effective way. I got this method from one of my blogger acquaintances.

Benefits of AMP Pages in parameters amp=1


Before I explain, I will mention some of the advantages that will be obtained when implementing AMP HTML in the Blogger parameter amp= 1
  • Can apply AdSense Anchor Ad on the mobile page by using AdSense Auto Ads.
  • Can add JavaScript in mobile mode template.
  • AMP pages (amp = 1) will only be accessed if visitors come from AMP viewer such as Google or Twitter. 

Here are the steps to change the custom parameters AMP Blogspot pages, from m=1 to amp=1

Change the AMP special page from m=1 to amp=1

This method can be done by using the Blogger Operator URL data tag with the syntax params 
Go to the menu Edit HTML on Themes. Then follow the steps below

Find this:
<HTML expr:dir='data:blog.languageDirection' lang='id'>

<b:attr cond='data:blog.isMobileRequest == &quot;true&quot;' name='amp' value='amp'/>


or the code below, for those of you who haven't changed the special parameter amp to m=1

<HTML amp='amp' expr:dir='data:blog.languageDirection' lang='id'>


And then replace with below code :
<HTML expr:dir='data:blog.languageDirection' lang='id'>

<b:attr cond='data:view.url == data:view.url params { amp: &quot;1&quot; }' name='amp' value='amp'/>
Pay attention to the yellow code, it is the use Blogger Operator URL to make the new parameter to be amp=1.

Next, we will set the canonical for the main page and the special page for AMP HTML.

Find below code:
<b:if cond='data:blog.isMobileRequest == &quot;false&quot;'>
<link expr:href='data:blog.url' rel='canonical'/>
<link expr:href='data:blog.url + &quot;?m=1&quot;' rel='amphtml'/>
</b:if>

<b:if cond='data:blog.isMobileRequest == &quot;true&quot;'>
<link expr:href='data:blog.url' rel='canonical'/>
</b:if>

Or if it's not found, just look for the canonical section like this:

<link expr:href='data:blog.url' rel='canonical'/>

Delete the code, and replace it with what I made below:
<b:if cond='data:view.url != data:view.url params { amp: &quot;1&quot; }'>
<link expr:href='data:blog.canonicalUrl' rel='canonical'/>
<link expr:href='data:blog.canonicalUrl + &quot;?amp=1&quot;' rel='amphtml'/>
  </b:if>
<b:if cond='data:view.url == data:view.url params { amp: &quot;1&quot; }'>
<link expr:href='data:blog.canonicalUrl' rel='canonical'/>
  </b:if>

Up here, the actual process is complete. But if you previously used the parameter m=1 for special pages of AMP HTML, you must follow the steps below because usually there will be a slight error.

Final Process

Look for all blogger tag code for mobile m=1 as below:

<b:if cond='data:blog.isMobileRequest == &quot;true&quot;'>
Change with below data tag:
<b:if cond='data:view.url == data:view.url params { amp: &quot;1&quot; }'>

Find this:
<b:if cond='data:blog.isMobileRequest == &quot;false&quot;'>

and change with:
<b:if cond='data:view.url != data:view.url params { amp: &quot;1&quot; }'>

Showing Element on AMP Pages only

To display all elements or widgets only on the AMP HTML page, then you only need to wrap them with the new AMP  tag conditional. Example:
<b:if cond='data:view.url == data:view.url params { amp: &quot;1&quot; }'>

   <!-- Contents -->

</b:if>
If you want to display elements in other than AMP pages, use this conditional tag:
<b:if cond='data:view.url != data:view.url params { amp: &quot;1&quot; }'>

   <!-- Contents -->

</b:if>

That's the article about the trick for Changing Blogger AMP Parameters from m=1 to amp=1. You still have to achieve the performance of your special AMP page in the Search Console.