Showing posts with label BLOGGING. Show all posts

March 2, 2019

How To Embed a Web Page on Another Site


1.Login to your dashboard--> layout- ->Page Elements
2.Click on 'Add a Gadget' on the sidebar.
3.Select 'HTML/Javascript' and add the code given below and click save.
<iframe height="400" width="90%" frameBorder="0" src="URL OF WEB PAGE">your browser does not support IFRAMEs</iframe>


Note :
 Remember to replace URL OF WEB PAGE,with the url you want to embed into your site.You can change height,width.

Look at the example below.
<iframe height="400" width="90%" frameBorder="0" src="http://google.com">your browser does not support IFRAMEs</iframe>
Now you are done.

February 28, 2019

How To Add Comment Form Under Every Post

Commenting is a very helpful feature for every bloggers,Because They can know what visitors think about their site.We can easily integrate comment form under every post with no extra effort.To do this follow these simple steps.
log in to your dashboard--> Setting- -> Comments
Now goto "Comment Form Placement" and Check "Embedded below post" Option.
Click on Save Settings.You have successfully embedded Comment form in your blog.
Note : Wait !!! If Above method doesn't work for your template continue with below steps.(including above step)
Go to Layout- -> Edit HTML.
Click on "Expand Widget Templates".
Scroll down to till you see below code:
<b:include data='post' name='comments'/>
Now copy and paste below code immediately below the above code:
<b:include data='post' name='comment-form'/>
Now save your template.You are done.

February 24, 2019

BLOGGING

CopyScape Plagiarism Detection Software Checks Content Originality

Copyscape is an online service which will let you find who is copying your blog post and using RSS feed to create an auto RSS blog. Though Google takes copy content spam seriously but sometimes due to duplicate content and search engine algorithm, Google may treat copied content as original, and you might lose search engine ranking because of copied content.
Though we know how to fight against blog plagiarism before that it’s important to know which blog is copying your content and this is where Copyscape come into the picture.

How to use Copyscape?

Copyscape offers a free and premium version . To start with you can try their free version and if required, you can always try premium version of Copyscape.
Go to Copyscape homepage and type your blog address and hit GO button.
Copyscape
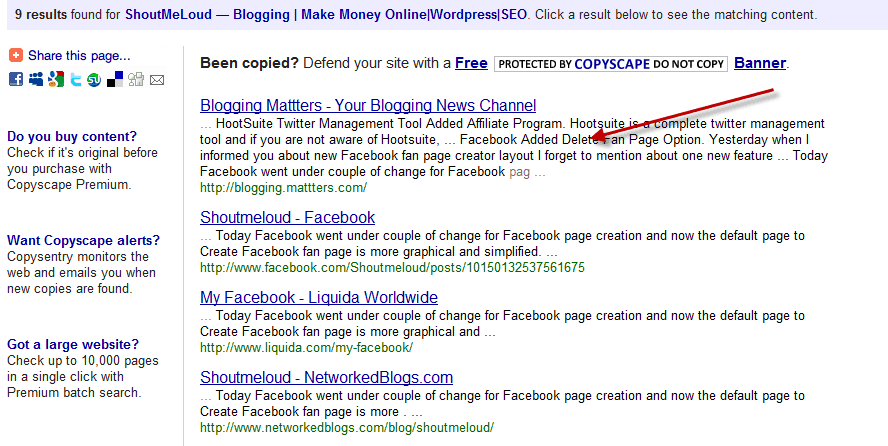
On the next page, you will see result from the page which has copied posts from your blog. If you are using notes and other feature of social bookmarking websites, you might see such results here. You can ignore such results.
Copied content Copyscape
Now try to find hosting and other details and refer to this post to report such websites which are copying content from your blog. At the time of writing, I might not go for the premium version of Copyscape but in future, I will certainly try its premium version.
Here is a video that explains everything about Copyscape:
Once you have found out which all websites/blogs are copying content from your site, next task is to report it to Webhosting, blogging companies like (Medium, WordPress, Blogger) & also get it removed from Google search. Usually I don’t really pay much attention to anything else apart from getting it removed from search engine. Below
Below mentioned guide will help you to get the post removed from search engine. Click on it to read it:
https://www.shoutmeloud.com/how-to-request-for-url-removal-of-copied-content-seo.html

Do let us know if you are using Copyscape or any alternative tool to copyscape to find people copying your blog content?

3 Free Tools To Analyze Your Blog Traffic Stats

BLOGGING

3 Free Tools To Analyze Your Blog Traffic Stats

Analyze Blog Traffic Stats
When it comes to analyzing blog traffic stats, we have ample amount of tools to analyze your blog stats. Some of them are paid, and some of them are free. When it’s come to free open-source tool, I never give a second thought about paid tools. Here I’m sharing 3 Tools which I always use to analyze my Website stats.
Blog Traffic Stats

List of Blog traffic Stats tool that I’m using:

Before we move ahead I also suggest you look into my list of Blogging tools, which will help you to discover some new tools for your blogging.
Google analytics:
Of all the traffic stats program, Google analytics is the best and free one. I have been using it since 2008, and I have seen it grown from the old design to the new design, which par excellence for any free product. I have shared a detailed post on What is Google analytics, and here are some of other posts related to G.A, which will help you to get more out of it.
  • How to add Google Analytics code to your WordPress blog
site-meter
Sitemeter:
Sitemeter is another great tool which I use. Though I don’t use it on all of my blog, because with one sign up they allow only one website monitoring, and that is something which I don’t like.  Here are some of the posts from past which will help you to make most out of site meter.
wordpress.com-stats
WordPress.com Stats plugin using Jetpack plugin
This is one of my favorite WordPress plugin to keep track of my stats. I like this plugin because I can see my traffic stats in real time. Most important it helps me a lot to find out daily stats of posts. So I can keep track that post is performing well. One another great feature is search engine keywords and referring posts. I like all this features in short, and if you are not using all these, you might like to get this plugin by installing Jetpack plugin.
Another one which I have not listed here but is quite notable is Statcounter which is a real-time stats program. They also have an iPhone and Google play app which makes it more meaningful.
Well, there are many more free and paid Blog Traffic Stats tool are there in the market, but above three are something that I use on WordPress powered blog, and they take care of my need.
Before you add the comment, I know more service like I mentioned above exist to keep track of website traffic. I will love to know your view on more such service which you use to keep a track of your site stats?

Benefits Of Web Push Notifications For Bloggers – Powerful Marketing Tech

BLOGGING

Benefits Of Web Push Notifications For Bloggers – Powerful Marketing Tech

Ting! You’ve got one new notification!
How many times in a day do you see such notifications on your mobile phone or your desktop browser?
Those who use apps like Facebook and WhatsApp are already accustomed to these kinds of messages. Most mobile phone apps have some kind of messaging system like this.
Most mobile phone apps
These are called push notifications.
This technology has been used by large enterprises and Fortune 500 companies for many years now, and this simple, little thing has contributed a lot to the growth of these businesses.
Thanks to a growing number of startups, this technology is now available for bloggers and small business owners to use for their blogs and websites.
If you are not using push notifications on your website/blog, then you are missing out on a lot.
Page Contents

How do web push notifications work?

Web push notifications enable you to send clickable messages to your subscribers’ browsers (they support both desktop and mobile). They work on an opt-in/opt-out basis so users can click to subscribe, and they can adjust their browser’s settings to unsubscribe.
How do web push notifications work
Image credit: LetReach
There are many online services that offer this marketing technology as both free and paid services. (I have recommended a few good services at the end of this article.) Most of them also offer WordPress plugins that make it easy for bloggers and entrepreneurs using the WordPress platform to make the most out of web push notifications.
After the initial configuration (refer to this tutorial), push notifications are sent automatically when you publish your post.
In the coming days, I will share many tips and advanced usage guides. But for now, let’s learn about the benefits that one will get when using push notifications.

Why should bloggers use web push notifications?

If you are using email marketing (free or paid), then it’s easy for you to understand the direct and indirect benefits of push notifications. Just like how email marketing helps you convert first-time visitors into subscribers for repeat traffic, web push notifications do the same thing.
Here are some of the most important things you need to know about push notifications…
1. They’re perfect for converting visitors into subscribers.
https://giphy.com/gifs/latelateshow-james-corden-late-show-xTiQyBOIQe5cgiyUPS
Most bloggers make the mistake of not trying to convert their traffic into regular subscribers.
When you give an option to first-time visitors to subscribe to your blog via push notifications, email, or any other method (like RSS), you now have the opportunity to let them know about any new post you publish.
This helps you to constantly increase your traffic with repeat visits.
This is actually how most of the top blogs manage to maintain such a high level of repeat traffic.
2. They drive real-time traffic.
You can’t really ignore this.
The ability to reach out to your readers in real-time is powerful, and the higher your real-time reach is, the more powerful your brand will become in terms of the viral effect it can have.
Imagine you publish a time-sensitive blog post and you need people to see that post ASAP. Only push notifications allow you to get the word out quickly and efficiently.
Drive real-time traffic
Here are a few practical implementations of real-time push notifications:
  • Promote your live video broadcast.
  • Promote a time-sensitive discount/offer/deal.
  • Give exposure to your latest social media updates.
Apart from driving traffic to my newly published posts, I have also tested push notifications for sending traffic to last minute deals, and the conversions for such promotions were great. This is indeed an effective conversion technique.
3. They let readers know about your brand uniqueness.
Brand uniqueness
Pillar posts are the foundation of your blog, and if your new subscribers are not seeing the pillar content (or content that makes your brand outstanding), it will be hard for them to understand the impact of your brand.
Some push notifications services offer drip feed campaigns, and this is an effective way for you to let your subscribers see your most important content.
Pro tip: Most bloggers let users subscribe to their blog updates and then send them only new blog posts. Instead of doing this, you should nurture your newly subscribed users with your most important content, your brand ideology, your achievements, and other important content that helps your newly subscribed users learn more about your brand.

Here is what I do:

I use a service called PushEngage which offers segmentation and drip feed options. I segment users based on the category of blog posts they are reading, and then I send them pre-selected content based on their interest areas. This all requires a one-time setup (30-35 minutes), and after that, everything is automated.
Push Engage
Warning: You need to be cautious that you aren’t sending out too many notifications. If you are using the segmentation and autoresponder feature, then you should set up your system in a way that gives subscribers a limited number of notifications in a week.

Enabling Push Notifications For Your Website

There is no doubt that this is an effective piece of technology for driving traffic to a blog or website. The sooner you start using it, the sooner you will reap the benefits of this powerful marketing technology.
What about pricing and top service providers?
The best thing about this technology is that, in addition to paid packages, it also comes in free packages.
Many push notification service providers offer free services for the initial few thousand subscribers, and then charge you when you reach a certain number.
There are a few completely free services as well (for unlimited subscribers), but the only thing about them is they sell visitors’ data to ad agencies. This might be OK for personal sites and blogs, but for serious blogs and businesses, this could be catastrophic.
I will do another post in the coming days to explain about the hidden dangers of free services (like OneSignal). For now, I have listed all the popular services below:
  • PushEngage (We use this at ShoutMeLoud, and they are free for the first 2500 users.)
  • OneSignal (They are completely free.)
  • PushCrew
  • iZooto
  • LetReach
You can pick any of the services above and start using push notifications today.
This one little technique will help you instantly get more traffic.
If you are already taking advantage of this technology, then do share your experience and optimization techniques with us in the comments below.
And don’t forget to share this post with other bloggers and marketers to let them know about this great piece of technology.
Here are a few more hand-picked articles that will help you drive more traffic:
  • 5 Content Marketing Hacks For Attracting More Website Visitors (Plus Clients)
  • 3 Free Tools To Analyze Your Blog Traffic Stats
  • How To Change Post URL of Already Published Post Without Losing Traffic
  • 23 Effective Ways To Drive Traffic To Your Website
  • 12 Sure-Fire Ways To Get Traffic To Your Blog

How To Run A Giveaway On Your Blog Using Gleam & Grow Your Readership

BLOGGING

How To Run A Giveaway On Your Blog Using Gleam & Grow Your Readership

Gleam Review
One of the easiest ways to drive traffic & build a readership is by using giveaways.
This is also true for building email lists.
In the past, I have shared how a contest helps you to create readership & Vijay has shared some vital information on making your contest viral.
If you are already a regular reader of ShoutMeLoud, you must be aware of the various giveaways I run to help our community start blogging. Most of our giveaways are related to hosting, domain names, WordPress themes, online courses & some other stuff which makes it easier for anyone to start & grow their online business.

If you understand the importance of giveaways (maybe from reading earlier posts of ShoutMeLoud), let’s talk about a tool called Gleam which makes it easier for you to run your first contest.
If you are wondering what kind of prizes you should offer for your giveaway, here is a detailed guide to help you.
Before using Gleam to run giveaways here at ShoutMeLoud, I have also used Kingsumo which is another useful tool to run giveaways on a WordPress site. The only downside to Kingsumo is it’s way costlier. For anyone without a giveaway strategy, it’s not worth the price.
On the other hand, Gleam is a perfect tool to get started with your first giveaway as it offers a free plan & you can upgrade depending upon the features you need. For ShoutMeLoud, I use their “Pro” plan which costs only $39/month.
It’s good enough for running occasional giveaways. You can upgrade anytime for more features or downgrade anytime to save money. More on this later…
For now, let’s learn how to use this nifty tool for running & hosting your first giveaway.
Page Contents

Why is Gleam a great tool for running giveaways?

Most marketers use giveaways as a tool to build their lists.
This is a good strategy, but ROI is often not that great because such lists also consist of people who have no interest in your niche/product who only participated because it’s a free giveaway. This is why I recommend you use these contests to primarilygrow your social media following.
If you are getting sponsors for your contest, you can also use your contest as an incentive to give those sponsors more social media exposure.
Apart from building an email list, Gleam also gives you an option to grow your social media following and/or engagement. It supports all major social networking platforms including Instagram, YouTube, Twitter, and Facebook (to name a few).
Not just a tool for bloggers, Gleam is an ideal choice for entrepreneurs and internet marketers who are either launching a product or promoting a SaaS product. The best part is they have lots of sample contests that give you an idea of what is possible for your first (or next) giveaway.
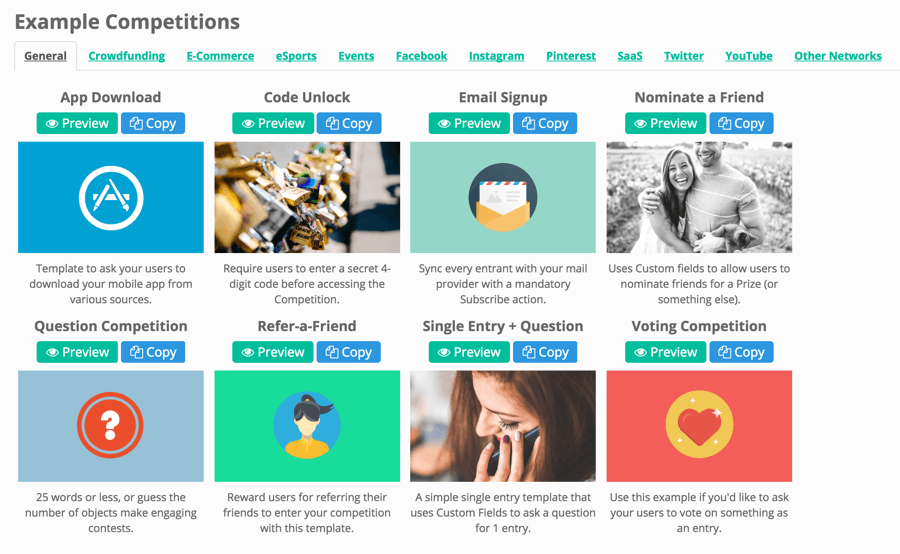
In fact, this is the first thing that you will see after getting inside your Gleam dashboard.
See this example screenshot:
gleam-contest-giveaway-example
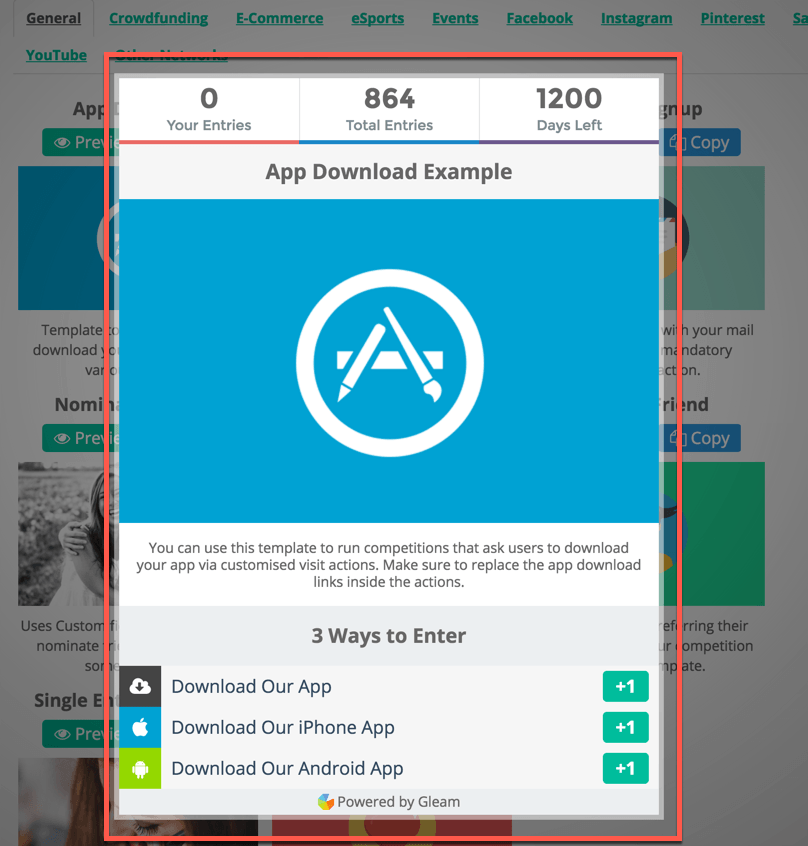
In the below screenshot, you can see an example of a contest created for an app download:
contest-example-app-download
The possibilities are endless with the features Gleam offers.
Since you & I are on the same page now, let’s start by creating a sample contest.
(This is an actual contest I created for ShoutMeLoud readers.)
  • Create an account on Gleam
Once you are inside the dashboard, you can start creating a giveaway in two ways.
  1. You can copy a giveaway idea from the example competitions.
  2. You can create a new competition from scratch.
  • For this tutorial, I’m creating a contest from scratch.
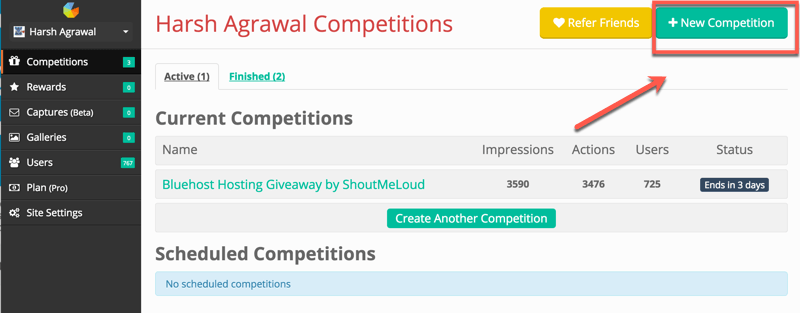
create-a-new-competition
Setting up the giveaway
It only takes a few steps to set up the giveaway.
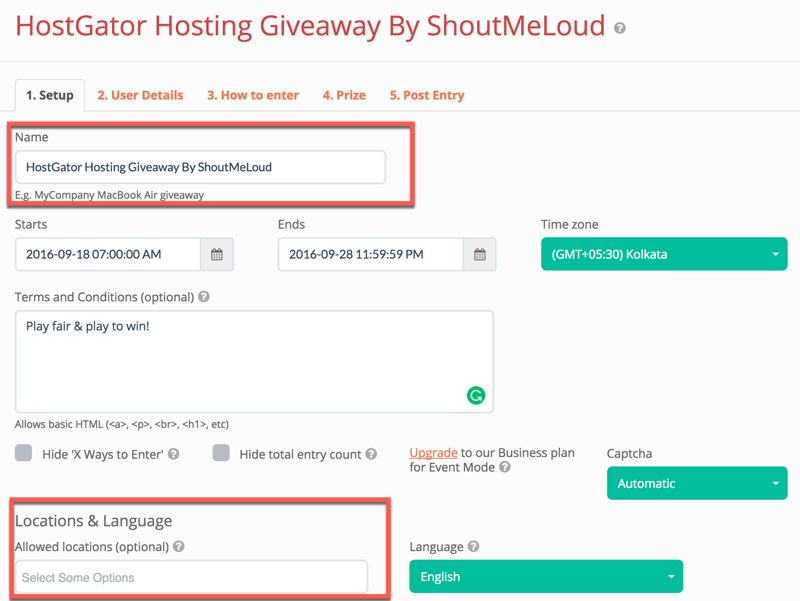
The very first thing you need to do is give a name to your giveaway & set the start and end time.
setup-giveaway
Do notice the box that says “Locations & Language”. Using this, you can restrict your giveaway for a specific geo-location. I believe this is useful for many of us in specific scenarios.
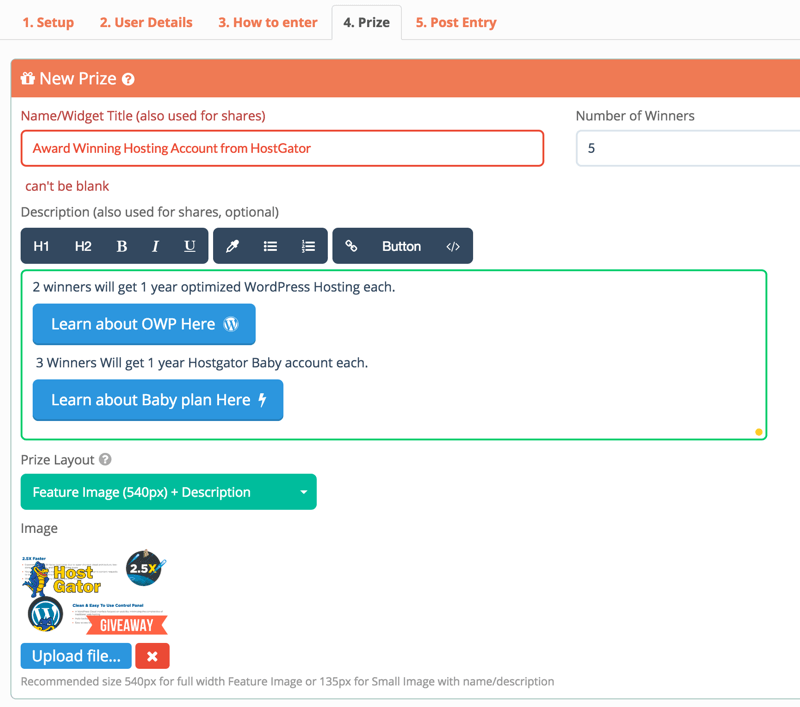
Once you have completed all the fields here, click on the “4. Prize” tab to enter the prize information:
giveaway-prize-configuration
How to enter
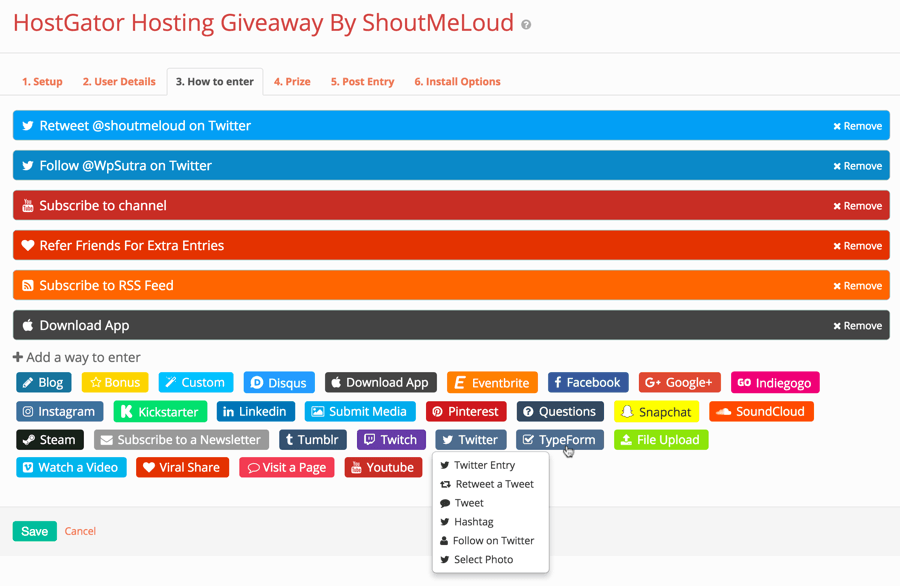
This is where things get interesting as you can set rules/conditions for users to participate in the giveaway. This section completely depends upon your target & what you want to achieve with the contest.
how-to-participate-into-the-contest
You can make any method of entry as mandatory or optional.
I usually make email subscriptions & viral shares mandatory. If you also want to build an email list, you should select the “Subscribe to a Newsletter” option.
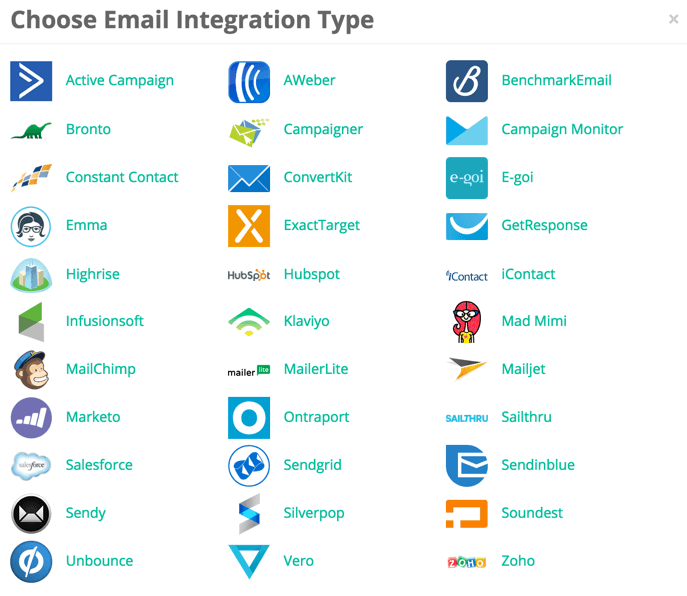
Currently, Gleam supports the following email marketing services:
email-integration
I use AWeber & ConvertKit to manage my email list. You can read about AWeber and ConvertKit in detail over here.
User details
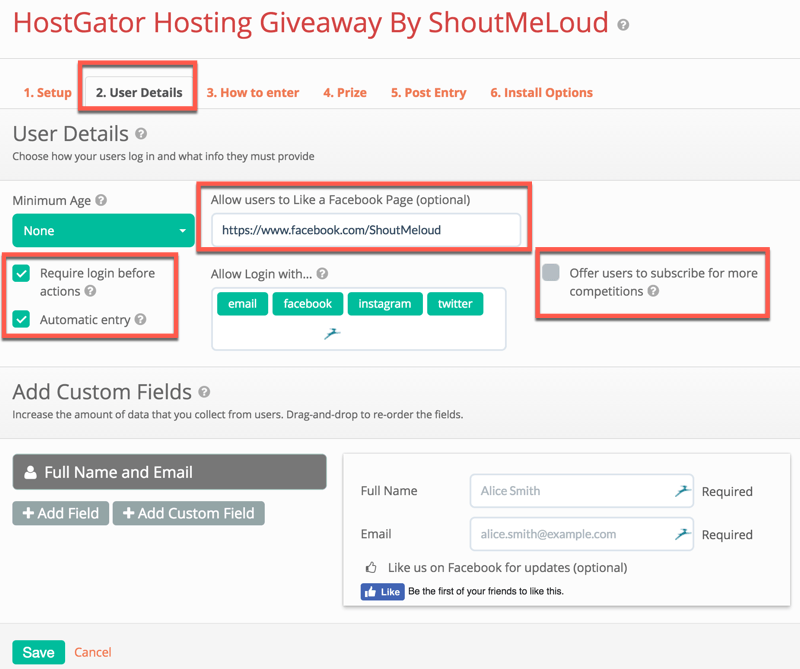
In my case, I made the email subscription mandatory so users don’t have to login before taking an action.
But, if you are not building an email list, you might want your users to sign in. For this, you can click on the “2. User Details” tab & configure the settings. Again, this is simple & straight forward so you should have no issues configuring it.
user-details-contest
Click on “Save” & that’s it. You are done creating your contest!

How to add your contest on your blog or Facebook page

Now, the next step is to add the contest on your blog or Facebook page (or simply let Gleam host your giveaway page).
If you also want to embed the contest on your blog post (just like ShoutMeLoud did), click on the “6. Install Options” tab & copy/paste the code into your blog post where you want giveaway widget to appear.


Since this contest is currently live, you can see the example of the giveaway we just created in the above giveaway widget.

Picking the winner & handling the faulty submissions

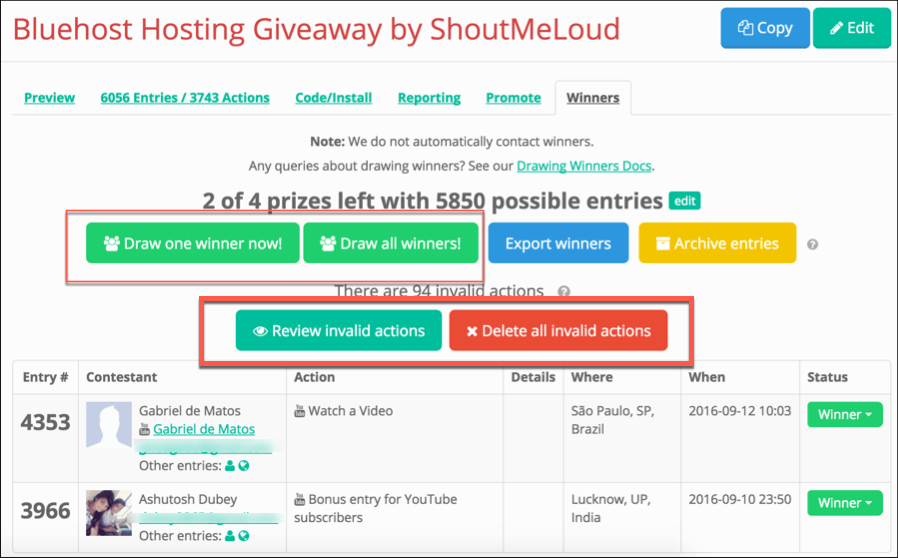
Once the contest is over, you can directly select winners from the Gleam dashboard. They also handle bogus entries.
Here is a result from the latest giveaway I ran for Bluehost hosting:
picking-the-winner
The winners’ names can also be displayed on the widget. This saves a lot of time & once you have set up everything, the next contest could be run by one of your team members.
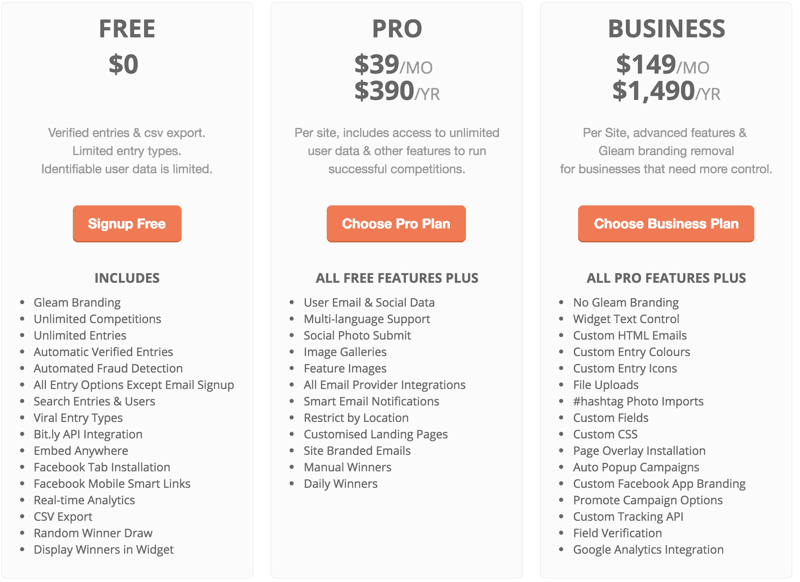
Pricing & conclusion of Gleam review
gleam-pricing
I have used various giveaway tools in the past, but to date, Gleam is the best.
It offers all the features one needs to run a successful giveaway. The base plan starts with a price tag of $0 which is perfect for anyone with no budget.
For a user like me or you, the “Pro” or “Business” plan is most appropriate.
As I said earlier, you can always downgrade your plan to free or upgrade your plan to Pro/Business. This way, you are not locked in with them forever & you pay only for those months when you need to run the contest/giveaway on your blog or Facebook page.
Get your account on Gleam
Overall, I’m pretty happy after using Gleam & give it 5/5 stars for the great features & perfect pricing.
If you have never hosted a giveaway before, this is the right time for you to start.
If you have a popular blog, you can drop an email to responseback@outlook.com for getting sponsorship for one of our products (here & here).
Do let me know: how did you find this review & what kind of giveaway are you planning to host using Gleam?
Do share this guide with others, as it might help them to grow their blog with the help of giveaways!

This Is Exactly What Your First Blog Post Should Be About

BLOGGING

This Is Exactly What Your First Blog Post Should Be About

So you’ve finally decided to start a blog…
You want a life where no one will have the right to tell you what to do, how to do it, and when to do it.
That’s what we all want, right?
And the truth is that blogging can afford us such freedoms and luxuries.
But in order to be able to get there, we need to make sure that what we’re doing is done right.
So after you’ve set up your blog, you’ll need to start writing posts.
Your first blog post will serve as the primary basis of your blogging business. Get it wrong and you’re doomed to fail. But if you get it right, you’ll lay the proper foundation for success.
It doesn’t have to be anything mind-blowing, but you want your first set of visitors to come back to your blog after reading your first article.
You want to captivate them so much that they can’t help but tell their friends about this excellent blog they’ve just discovered (yours).
Most people don’t worry too much about this in the beginning. After installing WordPress, all most bloggers want to do is to publish anything just to let the world know that they’re online.
Sorry, it does not work like that.
The brutal truth is that if you fail to capture your first visitors’ interest at a deep level with your first article, you will lose them forever.
So with that scary truth bomb out of the way, let’s look at how to write a great first blog post.
Page Contents

How To Write Your First Blog Post

As a blogger who is just starting out, here are some things you should mention in your first post.
1. Who Are You?
Who Are You
You’ve just jumped into the online world, and no one knows anything about you. If I am supposed to trust you and bookmark your blog, then I will need to know who you are.
People want to connect with you on a deep level. Tell them:
  • What have been your experiences in life?
  • Is this your first blog?
  • Who are you as a person, as a professional, as a blogger?
The more you tell about yourself, the more readers will get used to you, and the more they will trust you and want to hear what you have to say.
Not only should you use your words to talk about yourself, but you should also show some pictures.
Don’t just be “the strange man behind the keyboard”.
Having your own pictures on your own blog will show authenticity, and your readers will start to trust you.
Bottom line, tell (and show) your readers all they need to know about who you are. The more information you give, the easier it will be for readers to connect with you.
2. Why Are You Blogging?
Why Are You Blogging
This is a really important point. If people don’t know why you’re doing what you’re doing, they’ll have no reason to trust you.
One thing you should do when answering this question is to keep your audience in mind.
Ask yourself:
  • Why would someone come to my blog?
  • What would they be looking for?
  • What’s in it for my readers?
Tell your audience why you’re there. They’ll appreciate it.
And they’ll want to connect with you.
3. What Are You Going To Be Blogging About?
Blogging About
This is similar to the second question. Once you’ve answered that one, this one becomes easier to answer.
Tell your audience what they should be expecting on your blog.
Let them know exactly what they will see every time they come to your site.
It can also be a good idea to let them know how often you’ll be updating the blog and at what days and time (if you’ve set a schedule).
Don’t create yet another generic blog where you will be writing about anything and everything. Make sure your blog is well-focused on a particular topic. This will boost your authority level and allow for your audience to see you as an expert in your field.
4. Who Are You Writing For?
Writing For?
In your first post, don’t forget to talk about your target audience.
  • Who are the people you will be writing for?
  • What are they like (ambitious, lazy, very busy, etc.)?
The point is for you to empathize with readers so that they will feel welcomed and trust that you understand their problems.
Come up with an emotional story, and let your audience know that you’re there for them.
5. How Can They Get Involved?
How Can They Get Involved?
You need to let your readers know how they can get involved.
  • Do you encourage comments?
  • What about guest posting?
  • How can readers email you if they have questions, suggestions, or complaints?
You need to let them know they can reach out to you if they need to. Also, don’t be afraid to encourage disagreements.
Some of your readers will disagree sometimes, and if they can’t share those disagreements with you, they won’t trust you.
Therefore, do whatever you can to ensure that feedback is appreciated and encouraged.
If you prefer being contacted at a particular time of the day/week, let them know at what time it should be.
6. Clearly State Your Blogging Goals
State Your Blogging Goals
This is a no-brainer. You should share the goals of your blog with your readers in your very first post.
  • What are you looking to achieve with the blog?
  • What will you want the blog to be like in 3-6 months?
Sharing your goals with your readers will make them understand that you value transparency.
When you share your goals with them, they’ll want to help you achieve those goals.

Writing Your Introduction Blog Post

Starting a blog is not always the main thing; you also need to make sure you start right. If your first blog post contains all the elements I mention here, then you’re off to a good start.
Make sure they know that you are an open, honest, and passionate blogger.
Make them understand you’re not here to sell them some snake oil.
Let them know that you’re here to help.
What kind of things do you recommend putting in a blogger’s first blog post? What things do you have in your first post? Let me hear your thoughts in the comments below!
Like this guide? Don’t forget to share it!